Question: I run a fairly large commercial vehicle (CV) workshop in the UK, and we are having problems when testing ball joints and associated parts.
Last week, we had a warranty return rejected by the part manufacturer as they couldn’t find a fault with it, yet the technician who changed the part assures me there was excessive play in the joint. I don’t want to be in this situation again as I’m out of pocket in terms of the cost of labour and parts.
I was wondering, do you have any technical publications/bulletins or anything in written form, which I can pass on to my technicians, that will give them the basic procedures and information that will allow them to make a correct diagnosis of faulty ball joints?
The quick answer is yes! But first of all, I’d like to make this comment.
The checking and testing of ball joints is a difficult thing to do and should only be attempted by an experienced HCV technician with the knowledge to understand and evaluate his findings. Often, track rods are described as “defective” because axial play dictated by the actual design of the part is believed to be the result of wear. In fact, many technicians don’t fully understand the conditions under which the vehicle is tested can determine the outcome. For example, the vehicle should only be tested as it would be driven; with the axle under load. Under no circumstances should the axle be relieved of load.
The following will give your technicians a good basis on how to test these parts.
How-to-guide
Vehicle condition - ready to be driven and loaded. The axle to be tested must not be relieved.
Preparations - clean joint, including sealing bellows and connecting parts. Do not use cleaning agents or solvents, as these could contaminate the bellows. Use a dry cloth or cleaning rag instead. Do not damage the bellows.
Corrosion - Housing, shaft and cover must be free of deep corrosion (pits up to about 1mm depth allowed). It is particularly important to check the rolled edge at the side of the cover. Renew joint or steering/tie rod if the result is not satisfactory. The contact and joint surface of the counterpeice (e.g. steering/track arm eye) must be cleaned from corrosion.
Bellows - Deform the bellows by hand (massage) and check that no grease escapes from the bellows wall. Grease is only allowed to escape from the bellows opening. In addition, carry out a precise visual check of the surface. There must be no indication of holes, tears or chafe marks. Damaged bellows may cause ad hoc failure of the joint due to possible influx of water and dirt into the joint.
Renew joint or steering/tie rod if the results are not satisfactory.
Clamping ring and clamp collar - Clamping rings and clamp collars press the bellows for sealing purposes against the housing or the pin.
These must lie concentrically on the plane of the counter groove. It must not be possible to rotate the bellows on the housing using manual force (do not use tools.). To this purpose, the bellow is held in the area of the clamping ring or clamp collar at the housing and an attempt is made to rotate it.
Renew joint or steering/tie rod if the result is not satisfactory.
Self-locking nut - The self-locking nut must be properly fixed. The screw connection to the pin attachment must be checked for proper positioning.
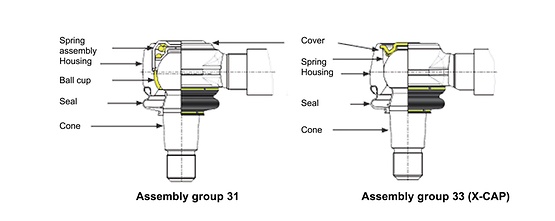
Turn the steering wheel (with loaded axle) to the right and left alternatively until the front wheels move.
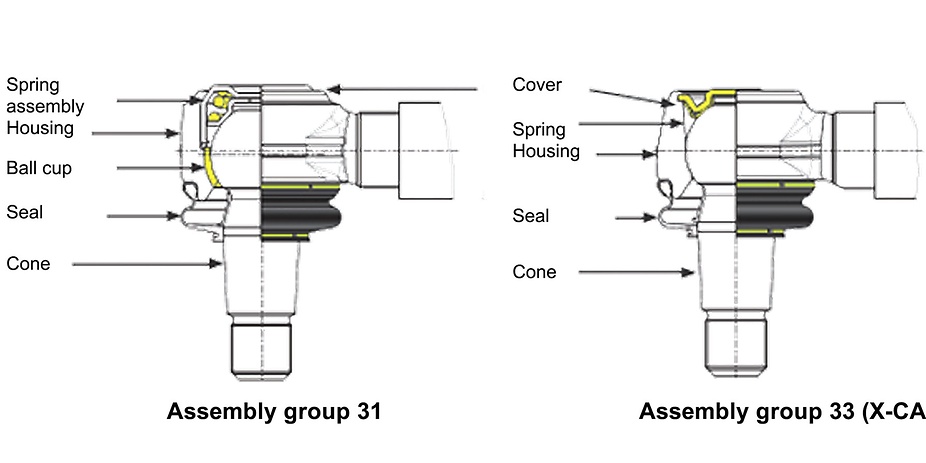
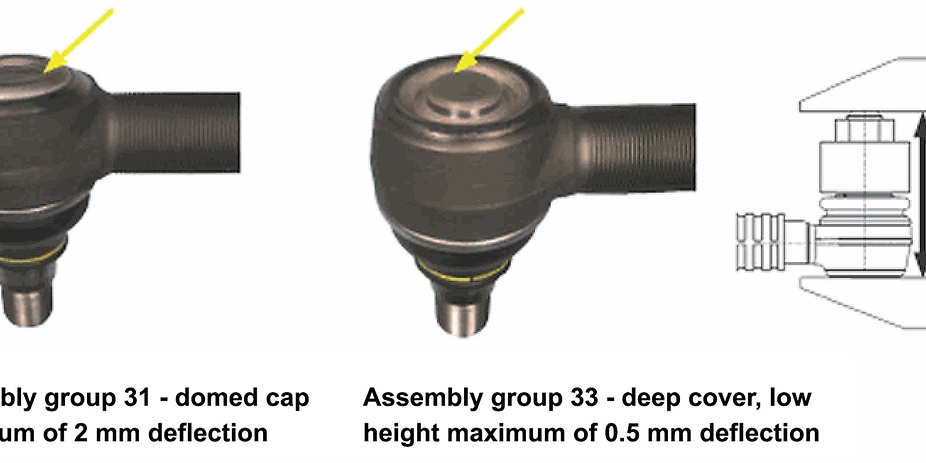
Joint design component group 31
During this process spring deflection of the ball pivot against the housing must not exceed 2.0mm axially.
Joint design component group 33 (X-CAP)
During this process spring deflection of the ball pivot against the housing must not exceed 0.5mm axially.
In borderline cases, this path must be checked using an appropriate measuring device (e.g. caliper gauge).
The radial movement is difficult to measure in the vehicle. TRW has the possibility to measure such data in special cases with a special device. As a rule the measurement of the radial play is not necessary. If the axial deflection is ok, the radial deflection is in the specified tolerance range.
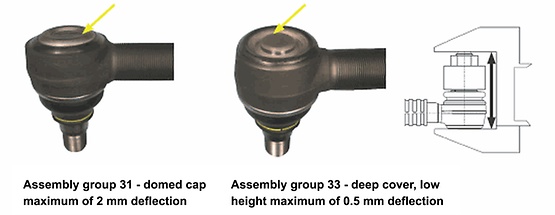
Identification by the shape of the end cap
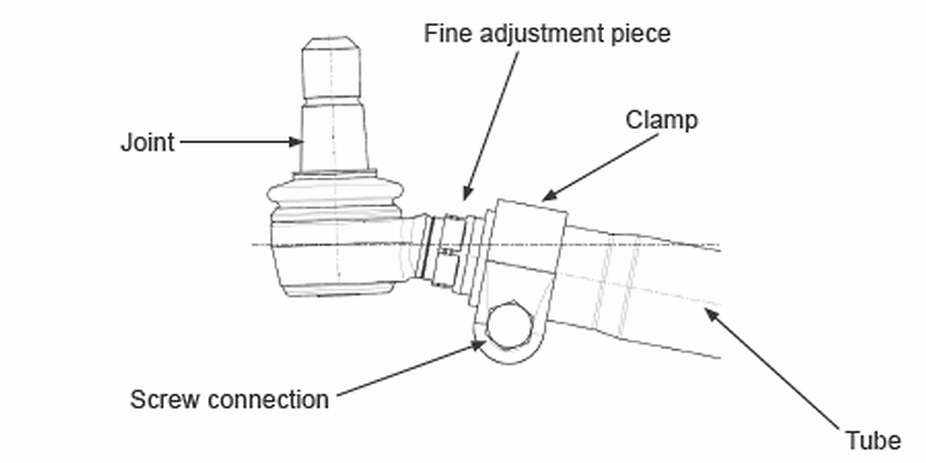
Visual check of the clamping screw connection including precision adjustment piece - The clamping screw must be properly fixed. The nut must be fitted firmly against the clamp. The screw may not be visibly bent.
Localised corrosion of more than 1.0 mm depth may not be visible at screw, nut and clamp or precision adjustment piece. If the clamp, precision or adjustment piece or the joint are not firmly fixed, premature damage to the thread may be expected. Renew joint or steering/tie rod if the result is not satisfactory.
If the clamp or clamping screw is stuck to the nut and strong corrosion is detected, these parts must be replaced.
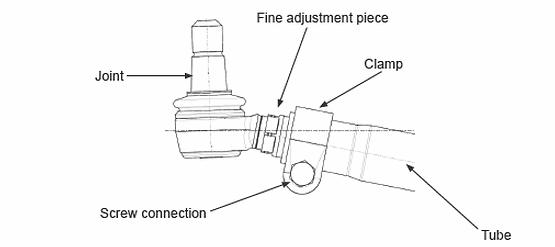
Screw connections with the precision adjustment piece/tube - Turn the steering wheel to the right and left alternatively until the front wheels move and check (e.g. using finger), whether the thread moves in the precision adjustment piece/tube.
If movement is detected this means that premature damage to the thread can also be expected. The steering rod/tie rod should be replaced if the results are not satisfactory.
Checking the tube - Check the tube visually for damage. If deformation due to force has been detected, replace the steering/tie rod.
Note: Repairs to motor vehicles should only be carried out by appropriately qualified motor mechanics. Please note that specific makes and models of motor vehicles differ, and that the advice given in this website may not be appropriate in all cases. ZF Aftermarket will not accept any responsibility or liability for loss or damage howsoever caused as a result of reliance upon the advice given in this website, save to the extent that such liability may not, by law, be excluded.
ZF Aftermarket product range
Discover the complete portfolio of suspension systems in our product catalog.
